|
|
 |
|||
|
|
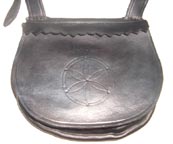
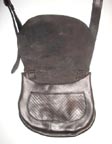
I recently got a copy of Recreating the 18th Century Hunting Pouch by T.C. Albert. It's a very good book with step-by-step instructions and great illustrations. I've done a little bit of leatherwork before -- mostly belts, straps, and a couple of knife sheaths, though, so something as ambitious as a hunting pouch seemed daunting. However, using the steps in this book, I made and finished an 18th century hunting pouch in two weekends. Simple leatherwork isn't really harder than sewing fabric once you know the proper techniques (aside from needing greater hand strength -- pliers help, as does making sure your holes are well pierced) -- but it's not intuitive for someone coming from a textiles background, so a few things tripped me up about 10 years ago when I was trying to sew leather for the first time without any guidance. For instance, you sew leather while it's damp so that the awl will pierce the leather more easily, and so the leather will form to the proper shape. Second, you can't pin leather as you can pin fabric, so you use tacks instead -- pierce a few holes along the seam you'll be sewing, then thread some linen thread through the holes to hold the pieces of leather securely in alignment while you sew. The stitching technique is also different; you pierce the holes with an awl before stitching the leather, use blunt needles rather than sharp ones, and the primary stitch used is the saddle stitch. I found an old stitching clamp with nice, deep jaws on Ebay. It's better than Tandy's stitching pony, which is fairly shallow and is basically good for small stuff like wallets. There are a few sources for stitching clamps online if you search for "leather stitching clamp"; I'm told that they can also be made from barrel staves. Stitching clamps really help speed things up, since they hold the leather for you while you sew using both hands. The dimensions of this pouch are 8" wide x 6 1/2" deep, not including the gusset. I was going for a slightly more ornamented look, since I eventually want this to go with a Pennsylvania transitional rifle my hubby has promised to build me. Pics of the pouch:
|
|||
I used Tandy's new low-VOC Eco-Flo dye in cocoa brown on the pouch, but decided that I really don't like it as much as Fiebings; it's a bit goopier, and doesn't seem to absorb into the leather as well or as quickly as Fiebings, so I wound up putting on more than two coats and used more than half the 4-oz. container on the project. I've since made up some traditional iron oxide and vinegar leather stain, and am using that on a leather snapsack I'm making. I showed the pouch to Mr. Wilde of Wilde Weavery at a recent event and he said that he thinks the leather recommended in the book (4-5 oz.) is actually a bit too heavy, based on period examples he's seen; he uses lighter weight leather for his hunting pouches and doubles the leather for the lid. There are certainly a number of calfskin and pigskin hunting pouches in The Kentucky Rifle Hunting Pouch by Madison Grant. |
||||
|
|
||||
|
|
||||